There are quite a few posts out there that try to explain how to set up S3 and CloudFront to serve up your single page Angular2 app. However, they are incomplete, lead you into more configuration than is necessary and/or don’t do what I think is best practice.
This HOWTO will take you step-by-step through the following:
- Domain registration via Route53
- FREE SSL certificate creation via Certificate Manager (ACM)
- Naked/apex domain support
- Multi-domain redirection without servers
- Gzip’ing and uploading your Angular2 app to S3 WITHOUT the need for static website configuration
- Serving your app out of CloudFront CDN with support for: SSL, root apex, SSL upgrading, Angular2 routing and 1st load sub-directory URLs, far future content expiration (for high cache hit ratio), HTTP/2, and multiple domains
In the end you will have a lightning fast SECURE page, with fortune 500 reliability and durability – all for cheaper than you will believe.
Step 1: Register your domain(s) and create SSL cert via ACM
I highly recommend using AWS Route53 to register your domains. It’s $10/year for .com’s with no bullshit price changes or coupon hunting. Super easy to use and gives you lots of easy integration with other AWS services like CloudFront, EC2, ELB, S3 etc.
For this example we pretend I registered rynop.org and rynop.com
Next go to the Amazon Certificate Manager (ACM) console page and request a certificate. Put in your root apex(es) (aka naked domain) and all your subdomains. ACM SSL certs are FREE and they auto-renew. It’s similar to letsencrypt but zero overhead. Ex:
rynop.org, *.rynop.org, rynop.com, *.rynop.com
You will get an email to your domain admin contact email addresses to approve.
Step 2: Create S3 bucket and upload hello world HTML page
Create an s3 bucket (Ex: www.rynop.com). Create a file named index.html with the following contents. When you upload the file make sure to give it public read permissions.
Note: you will notice I did NOT setup static website hosting on my S3 bucket. It is not needed as CloudFront will handle it all for you.
Step 3: Create and set up CloudFront distribution
Create a new CloudFront distribution, specify the “web” delivery method.
Use these settings (ones I do not mention, leave the default value):
- Origin Domain Name: (this should auto-complete to your s3 bucket) ex:
www.rynop.com.s3.amazonaws.com - Viewer Protocol Policy:
Redirect HTTP to HTTPS - Allowed HTTP Methods:
GET, HEAD, OPTIONS, PUT, POST, PATCH, DELETE(we want to do CORS) - Forward Headers: Both
Access-Control-*andOrigin - Query String Forwarding and Caching: Don’t choose
Noneif you use query string in your Angular app - Compress Objects Automatically:
Yes(It won’t re-gzip content) - Alternate Domain Names:
www.rynop.com. I omitted the root apex domains as we are going to setup another CloudFront distro in to redirect those towww.rynop.com. Don’t do naked domains over HTTPS. Google this if you care why. - SSL Certificate:
Custom SSL Certificate. Chose the cert you created in ACM - Default Root Object:
index.html. This is your Angular2 app entry point
Click Create Distribution. Then immediately go back and edit your CF distro. Choose the Error Pages Tab and press Create Custom Error Response. Fill in the fields like this for BOTH 403 and 404 errors:

This will now support when a URL change is emulated via pushState or directly navigated to when you type in your browser address bar.
You should now be able to go to http://www.yourdomain.com and it will auto-upgrade to SSL https://www.yourdomain.com
Step 4: Point your DNS to CloudFront distribution
Route53 makes this dead simple. Create a new record set (ex: www.rynop.com), type of “A”, alias “yes” and find your CloudFront distro DNS name. If it doesn’t auto-populate you can get the DNS name from the CloudFront web UI. It will be something like dsjaaauazh42i.cloudfront.net.
Do this for all your www sub-domains (if you have more than one).
Step 5: Setup redirects to https://www.yourdomain.com
We want http(s)://rynop.org, http(s)://rynop.com, and http(s)://www.rynop.org to re-direct to https://www.rynop.com
To do this we will leverage S3 static website hosting redirects to another hostname and another CloudFront distro to handle the SSL.
Create one S3 bucket, it can be named anything but I recommend making it your root apex domain name, ex: rynop.com
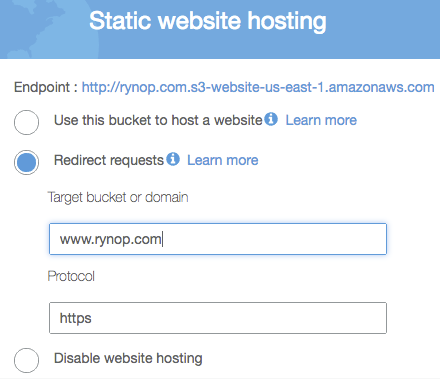
In the bucket properties, select Static website hosting > Redirect all requests to another host name and specify your http://www.domain in Redirect all requests to. Ex: https://www.rynop.com
On the bucket properties page, there is an Endpoint domain for the bucket. Copy this to your clipboard. Its in the format rynop.com.s3-website-us-east-1.amazonaws.com
Now go make a 2nd CloudFront distribution of type “web”. Set the following values:
Origin Domain Namepaste the Endpoint domain from your clipboard (omit https://)- Leave
Origin Pathblank. Viewer Protocol PolicytoRedirect HTTP to HTTPS.Custom SSL Certificatechose the cert you created in ACM.- Leave
Default Root Objectblank. - Alternate Domain Names
(CNAMEs) put all the domains you want to re-direct.
Click “Create distribution”. This will take about 20 minutes.
Now go back into Route53, and create “A” record set of type “alias” for each domain that needs to be re-directed. Select the CloudFront Distribution from the “alias target” dropdown. It may take a while to populate. If it does not populate after refreshing, copy the domain name for the CloudFront distribution from the CloudFront console, and use it as the value for “Alias Target”.
I created A record set aliases for rynop.com,rynop.org,www.rynop.org
Step 6: Verify SSL and re-direction
You can now validate the re-direct by running
curl -v "http://rynop.com"
You should get a 301 re-direct.
You can then put any of the domains you configured in your web browser and you should see the hello world html page.
Step 7: Compress and upload your Angular2 app
Angular build does a great job of creating your Angular static assets.
I highly recommend gzipping your assets BEFORE uploading to s3. CloudFront supports runtime gzipping however CloudFront will not gzip if its busy. All the consumers of your website have supported gzip compression for the last 15 years so you don’t have to worry about the Very: header.
With this in mind I created the following script that handles upload to S3 with CloudFront in mind:
I then call this script from yarn, by defining the following in my package.json, scripts section:
All you have to do is replace my bucketname in deploy:prod with the bucketname that hosts your Angular app. Note: you must install gzip-all as a development dependency.
Summary
You now have a single page app, who’s static assets have full HTTP/2 support, 11 nines of durability, infinite scale, free SSL, cached at the edge all over the world with zero servers to maintain and no ongoing renewals. You are ONLY charged for bandwidth and HTTP requests out of CloudFront (and the infrequent calls to your S3 origin).
Lots of setup here I know, but remember this is one time only and you are getting some world class features for almost nothing.
Next steps
If you’d like this all in a nice package, deployable via CloudFormation, check out my AWS Blueprint for an Angular app. It has most of this, plus much more – like easy deployment.
