I was aware that AWS STS allows you to obtain temporary AWS credentials, which can then be used to consume AWS services. I knew you could obtain these creds from a public identity provider (Google, Facebook etc) HOWEVER I wanted to use my own user pool (email/pw auth), not a public one.
I’m a huge fan of Firebase – there are tons of free services. A great one being Authentication. If you’ve ever worked with cognito, and try Firebase Authentication, you’ll appreciate it right away. It supports many providers, has email/password & email link login, and it even has anonymous auth. The SDKs and docs for web and mobile are great. I’ve used it in a mobile app (via nativescript-plugin-firebase) and it is awesome.
Wouldn’t it be awesome if I could get AWS STS talk to my firebase auth user pool? I could then create an Angular app that leverages Firebase auth for login AND uses that same pool to grant temp. AWS creds. From there I can use AWS services without ANY servers.
With this idea, I started on my journey – not knowing if it was possible. Spoiler: it is 🙂
Step 1: Create a Firebase project and enable email auth
- Create a FBase project here
- Under “Develop” on the left, choose Authentication > Sign-in method
- Enable Email/Password and Email link
- Add authorized domain(s) of your Angular app. I recommend using ngrok to serve your app locally.
Step 2: Create IAM ident provider and trust policy
The AWS Web Identity Federation Playground is probably the quickest way to understand the flow, however the AssumeRoleWithWebIdentity docs do a decent job.
In short, your Angular app will authenticate to firebase (I use AngularFire) and get an OIDC token – this represents your web identity token. You will then call STS AssumeRoleWithWebIdentity passing this token. STS will call your auth provider URL (your Firebase pool) and verify/validate this token. If all is good, it will return you temporary AWS credentials that can be used directly from the Angular code.
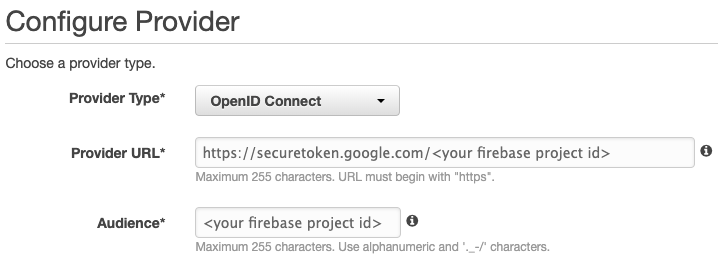
Head to the IAM Identity providers console and create a new provider. Choose OpenID Connect and for the provider URL specify https://securetoken.google.com/<your firebase project id>. The audience is also your firebase project ID. This will be compared against the aud attribute in the JWT from Firebase.
Cool, now lets create the IAM trust policy (just a role) that sets up rules to trust this new provider.
Create a role and select the web identity provider you just created:

Now we need to attach a policy – something simple like accessing an S3 bucket. In step 2 of the wizard click new policy. Click the JSON tab and paste:
{
    "Version": "2012-10-17",
    "Statement": [
        {
            "Sid": "WebIdentListRoles",
            "Effect": "Allow",
            "Action": "iam:ListRoles",
            "Resource": "*"
        }
    ]
}
Review and create the policy. Name and description you give doesn’t matter.
Go back to the create role browser tab, and hit the refresh button in the upper right. Choose the new policy you just created. Click next, and create the role:
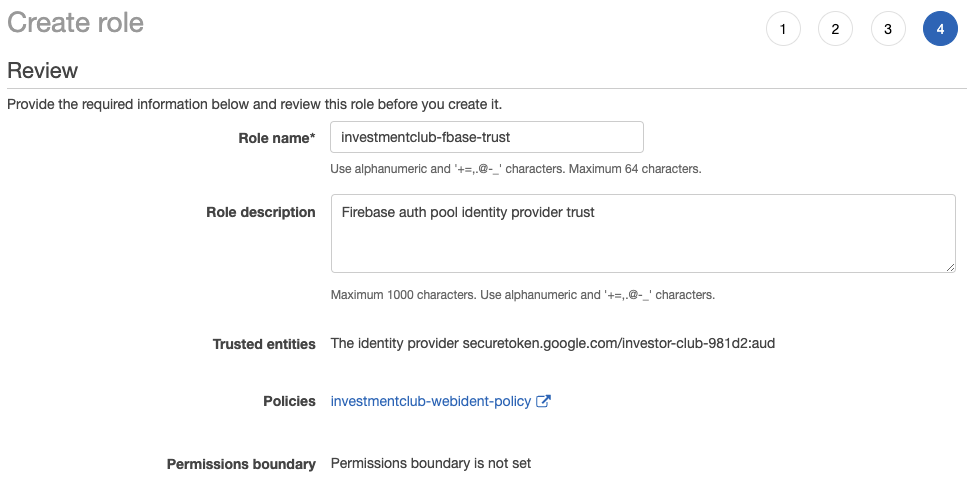
Cool now STS trusts our Firebase user pool identity provider.
Step 4: Wire up your Angular app
Creating an Angular app, and coding up Firebase auth are outside of the scope of this blog (helpful post1 and two). Make sure to add (window as any).global = window; to your polyfills.ts file.
My login.component.ts:
...
  ngOnInit(): void {
    this.checkEmailLinkSignIn();
  }

  async emailLoginLink() {
    try {
      if (!this.loginForm.get('email').value) {
        throw new Error('Invalid email');
      }

      await this.authService.doSendSignInLinkToEmail(this.loginForm.get('email').value);
      this.snackBar.open('Check your email for login link', '🙌');
    } catch (error) {
      this.snackBar.open('Send failed, did you specify your email address?', '️⚠️ Oops');
    }
  }

  async checkEmailLinkSignIn() {
    try {
      await this.authService.signinWithEmailLink();
      this.router.navigate(['/config']);
    } catch (error) {
      console.error('Problem with sign in with email');
      console.error(error);
    }
  }
...
Here is my auth.service.ts:
import { Injectable, NgZone } from '@angular/core';
import { AngularFireAuth } from '@angular/fire/auth';
import * as firebase from 'firebase/app';
const AWS = require('aws-sdk/global');
import { STS } from 'aws-sdk';

import { environment } from '../../environments/environment';
import { Router } from '@angular/router';

const WEB_IDENT_CREDS_SS_KEY = 'ic.tmpAwsCreds';

// Handle tmp aws creds across page refreshes
const tmpCreds = sessionStorage.getItem(WEB_IDENT_CREDS_SS_KEY);
if (!!tmpCreds) {
  AWS.config.credentials = new AWS.WebIdentityCredentials(JSON.parse(tmpCreds));
}

@Injectable({
  providedIn: 'root'
})
export class AuthService {

  constructor(
    private afAuth: AngularFireAuth,
    private router: Router,
    private ngZone: NgZone) {
    afAuth.authState.subscribe(async (fbUser: firebase.User) => {
      if (!fbUser) {
        this.removeAwsTempCreds();
        return;
      }
    });
  }

  async doSendSignInLinkToEmail(email: string) {
    try {
      const actionCodeSettings = {
        // URL you want to redirect back to. The domain (www.example.com) for this
        // URL must be whitelisted in the Firebase Console.
        url: 'https://' + window.location.hostname + '/login',
        handleCodeInApp: true
      };
      await this.afAuth.auth.sendSignInLinkToEmail(email, actionCodeSettings);
      window.localStorage.setItem('emailForSignIn', email);
    } catch (error) {
      console.error(error);
      throw error;
    }
  }

  async doLogout(): Promise<void> {
    try {
      this.removeAwsTempCreds();
      await this.afAuth.auth.signOut();
      this.ngZone.run(() => this.router.navigate(['/login']));
    } catch (error) {
      console.error(error);
    }
  }

  async signinWithEmailLink() {
    // Confirm the link is a sign-in with email link.
    if (this.afAuth.auth.isSignInWithEmailLink(window.location.href)) {
      // Additional state parameters can also be passed via URL.
      // This can be used to continue the user's intended action before triggering
      // the sign-in operation.
      // Get the email if available. This should be available if the user completes
      // the flow on the same device where they started it.
      let email = window.localStorage.getItem('emailForSignIn');
      if (!email) {
        // User opened the link on a different device. To prevent session fixation
        // attacks, ask the user to provide the associated email again. For example:
        email = window.prompt('Please provide your email for confirmation');
      }

      // The client SDK will parse the code from the link for you.
      const res = await this.afAuth.auth.signInWithEmailLink(email, window.location.href)

      window.localStorage.removeItem('emailForSignIn');

      if (!res.additionalUserInfo.isNewUser) {  //User added by admin (not sign-up from random dude from internet)
        await this.assumeAwsRoleFromWebIdent(res.user);
      }
    }
  }

  async assumeAwsRoleFromWebIdent(fbUser: firebase.User) {
    const token = await fbUser.getIdToken(false);
    let p: STS.Types.AssumeRoleWithWebIdentityRequest = {
      ...environment.stsAssumeWebIdentConfig,
      //environment.stsAssumeWebIdentConfig contains:
      //DurationSeconds: 3600,
      //RoleArn: 'arn:aws:iam::xxx:role/investmentclub-fbase-trust',
      RoleSessionName: fbUser.uid + '@' + (+new Date()),
      WebIdentityToken: token
    };

    // Store creds across page refresh, duno WTF `new AWS.WebIdentityCredentials(p)` don't have an option for this
    AWS.config.credentials = new AWS.WebIdentityCredentials(p);
    sessionStorage.setItem(WEB_IDENT_CREDS_SS_KEY, JSON.stringify(p));
  }

  removeAwsTempCreds() {
    AWS.config.credentials = {};
    sessionStorage.removeItem(WEB_IDENT_CREDS_SS_KEY);
  }

  async checkAwsTempCredsExpired() {
    if (AWS.config.credentials) {
      await AWS.config.credentials.getPromise();
      if (!AWS.config.credentials.expired) {
        return true;
      }
    }

    await this.doLogout();
  }
}
Few things to note here:
- My login form sends login link to email, when link clicked in email, `signinWithEmailLink()` is called in my auth service.
- AWS config creds are automatically set by calling STS
assumeRoleWithWebIdentity()under the covers when I make a call to AWS - For demonstration purposes I just list IAM roles, you will see the output in the web browser console
Lastly, I created a Firebase function that instantly disables new registrations, because for my investment club app I wan’t to control who can use it. This is absolutely a hack, due to the lack of a needed feature from Firebase. There has been an open issue for over 3 years. !res.additionalUserInfo.isNewUser just makes sure that only user’s created by me can do anything. This prevents a user that randomly stumbles by my site from using it.
Wrapping up
This demonstrates that it is possible and powerful to consume AWS services directly from a SPA Angular app with NO backend code, using an identity pool that you control (and is not Cognito).
AWS docs are pretty spotty in these areas, so hopefully this saved someone else some time.
